Monster Motorcycle Fairings: The Complete Guide to Bold Fairing Designs, Fitment & Quality
If you typed monster motorcycle fairings into Google, you're probably in one of three camps, and it's worth sorting out which one before you spend a dollar.
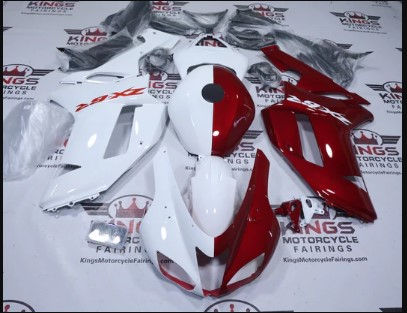
Maybe you want a fairing kit with a genuinely aggressive look think skull graphics, flame jobs, animal print, that kind of thing. Maybe you searched the phrase and landed on a company literally called Monster Fairings and now you're wondering if that's who you actually need. Or maybe you ride a Ducati Monster and you're trying to find bodywork for that specific bike.

We'll deal with all three quickly, then spend the rest of this guide on the stuff that actually matters no matter which camp you're in: how to tell a good fairing kit from a bad one, what OEM-quality really means, and how to avoid the fitment headaches that ruin a lot of first-time buyers' experience.
If you ride a Ducati Monster, you want bodywork built for that platform specifically - check our Ducati fairings collection and skip the rest of this section. If you're after a bold, custom-painted design, keep reading, because that's exactly what this guide covers. And if you got here looking for a specific brand, no worries - we're going to give you the same buying criteria you'd want regardless of who you order from.
Fairing Materials 101 - ABS Injection Molded vs. Fiberglass vs. Carbon Fiber
This is the part almost nobody explains clearly, and it's the single biggest factor in how your fairings will hold up.
ABS injection molding is the industry standard for a reason. Plastic pellets get heated and injected into a mold under pressure, which produces a panel with consistent thickness and a shape that matches OEM specs almost exactly. ABS flexes slightly under impact instead of shattering, which is why it's the go-to for street riders who might tip the bike over in a parking lot or catch a curb. It's also the most repairable a cracked ABS panel can often be plastic-welded, where fiberglass usually can't.
Fiberglass shows up more in custom and older-style kits. It can be laid up by hand into very specific shapes, which is useful for one-off track fairings or vintage bike restorations where an injection mold doesn't exist. The tradeoff is that fiberglass is more brittle — it cracks rather than flexes, and once it cracks, repair is messier and heavier than an ABS fix.
Carbon fiber is the weight-saving option, and it's genuinely lighter often 30-40% lighter than an equivalent ABS panel. That matters on a track bike where every pound affects lap times, but it's overkill for a daily street rider, and it comes at a real cost premium. A carbon fiber panel that costs $150 in ABS can run $400+.
For most riders building a street bike or replacing crash-damaged bodywork, ABS injection molded is the right call. Save carbon fiber for track builds where the weight actually matters.
What's Actually Inside a Complete Fairing Kit (And Why It Matters)
Here's something that trips up a lot of first-time buyers: not every "fairing kit" listed online actually includes everything you need to finish the job.
A genuinely complete kit should include:
Pre-drilled panels - holes already positioned to match your bike's mounting points
A bolt kit - the actual hardware to attach everything, ideally color-matched
A windscreen - clear or tinted, cut to fit the fairing
The tank cover or tail cowl piece - depending on your bike's layout
Decals - matching your paint scheme
Heat shield material - placed near the exhaust routing to protect the plastic from melting
We say this because we've heard from too many riders who ordered a full kit, got a box of panels, and then had to source bolts, a windscreen, and heat shielding separately - sometimes after their fairings already arrived warped near the exhaust because nobody warned them heat shielding wasn't optional.
Pre-drilled holes matter more than people expect, too. Drilling your own holes into a curved ABS panel is a good way to crack an expensive piece five minutes before you're supposed to be riding. If a kit isn't pre-drilled, budget extra time and expect a higher chance of a mistake.
If you only need to replace one damaged panel - say a nose fairing after a low-speed drop - individual pieces are the smarter buy over a full kit. No reason to pay for eight panels when you need one.
The Paint Process Behind a Quality Fairing (7-Step Process & Clear Coat Explained)
This is where the real quality difference between fairing sellers shows up, and it's almost never explained anywhere.
A proper paint job on a fairing kit generally goes through something like this:
Surface prep - sanding the raw ABS to give the paint something to grip
Primer coat - seals the plastic and evens out the surface before color goes on
Base color layers - applied in multiple thin coats rather than one thick coat, which prevents runs and gives more even coverage
Design/graphic work - whether that's masked-off color blocking, airbrushed graphics, or applied decals
Clear coat layers - this is what protects everything underneath from UV fading, road grime, and minor scuffs
Curing time - properly cured clear coat is harder and more chip-resistant; rushed curing is a common source of complaints
Quality inspection - checking for orange peel texture, uneven color, or decal edges lifting before the piece ever ships
A triple clear coat - three separate layers of clear applied and cured - genuinely does more than a single coat. It builds UV resistance so the color doesn't fade or yellow after a summer of direct sun, it adds a real buffer against rock chips and minor scratches, and it gives you that deep, glossy look instead of a flat, thin finish.
Here's how to spot a rushed paint job even in photos before you buy: look for orange peel texture (a bumpy, textured surface instead of a smooth mirror finish), color that looks thin or uneven especially at panel edges, and decal edges that look like they're lifting or bubbling. These are the tells of a single-coat, rush job - and they're the first things to fail once the panel is out in real weather.
At Kings, this is exactly the process we run every kit through - seven steps, triple clear coat, because a fairing that looks great on day one and looks chalky by month three isn't actually a good deal no matter what it cost.
How to Guarantee Correct Fitment Before You Buy
Fitment problems are the #1 complaint you'll find in aftermarket fairing reviews across every seller in this space, and almost all of them are preventable.
Start with the make/model/year lookup, but don't stop there. Manufacturers change body shapes mid-generation more often than people realize - a 2007-2008 CBR600RR and a 2009-2012 CBR600RR look similar at a glance but have different fairing mounting points. If a listing lumps years together that shouldn't be lumped together, that's a red flag.
If you're not 100% sure which sub-model you have, two things settle it fast: your VIN, which a seller can cross-reference against production specs, or the OEM part number stamped on your existing (even damaged) fairing, which removes all guesswork. Most sellers worth ordering from will ask for one of these if there's any ambiguity - if a seller doesn't ask and doesn't offer, that's worth noting.
Photo verification before shipping is a smaller thing that matters more than it sounds like it should. It means the seller sends you a picture of your actual painted kit before it leaves the warehouse, so you catch a wrong color or a design mismatch while it's still sitting on their shelf instead of after it's in your garage. This is standard practice at Kings for exactly this reason - it's a five-minute step that saves weeks of return shipping.
The fitment mistakes we see most often: ordering for the base model when you actually have an R or S trim with a different subframe, ordering based on your bike's model year instead of its actual production year (they're not always the same), and ordering for a bike that's already been modified with aftermarket subframe or tail components that don't match stock mounting points anymore.
Street-Legal vs. Track Fairings - What's Different
This distinction matters more with bold, custom designs than people expect, because heavy customization sometimes touches the parts of a fairing that regulations actually care about.
Street-legal fairings need to preserve a few functional things: cutouts for your DOT-required lighting (headlight, turn signals, running lights), proper mirror mounting points, and in most states, a spot for your license plate and plate light. These aren't style choices - they're what keeps your bike legal to ride on public roads.
Track fairings don't have to deal with any of that. Full belly pans that fully enclose the underside (required at most track day organizations to contain fluid spills), no lighting cutouts since you won't need headlights on a closed circuit, and often quick-release Dzus fasteners instead of standard bolts so you can pop panels off fast during pit stops for tire changes or crash inspection.
If you're going for a genuinely bold, aggressive custom design, double-check that your design doesn't accidentally eliminate a lighting cutout or mirror mount you actually need for the street. It's an easy thing to lose track of when you're focused on how the paint scheme looks in a mockup image.
Installation - What to Expect (Time, Tools, Common Mistakes)
A full fairing kit install isn't a five-minute job, but it's also not something you need a mechanic for if you're reasonably comfortable with basic tools. Realistically, budget half a day for your first install - experienced riders who've done it before can knock it out in an hour or two, but going slow the first time saves you from cracked panels.
You'll want a socket set matching your bolt kit hardware, a torque wrench (overtightening is the #1 way people crack brand-new panels), and plastic trim tools or panel clips for anything that snaps into place rather than bolts.
The mistakes we hear about most: cranking bolts down too tight and stress-cracking the ABS around the mounting hole, forgetting to place heat shield material near exhaust routing and coming back later to a warped panel, and losing small hardware pieces mid-install because they weren't kept organized - a magnetic parts tray solves this instantly and costs about eight dollars.
One tip that saves real frustration: remove your old fairings one piece at a time and immediately install the matching new piece before moving to the next one, rather than stripping the whole bike bare first. It keeps you from guessing which bolt went where.
Choosing a Fairing Seller - Questions to Ask Before You Buy
The aftermarket fairing market has a wide quality range, and pricing alone won't tell you where a seller falls on that range. Before you order from anyone, ask:
Does the kit include hardware, windscreen, and heat shield, or are those extra? Get this in writing, not just implied by a product photo.
Is there photo verification before shipping? This one step prevents most of the "wrong color arrived" complaints you'll see in reviews.
What's the return or warranty policy if the paint has a defect? Orange peel, chipping, or fading within the first few months should be covered - ask specifically, don't assume.
Can you actually reach customer support after the sale? A lot of complaints in this space aren't about the product at all - they're about not being able to get a response once there's an issue.
Quality genuinely varies a lot seller to seller in this market - that's not a knock on any one company, it's just the reality of an industry with dozens of manufacturers and wildly different quality control standards. Asking these four questions upfront, before you're already out the money, is the best filter available.
If you're ready to move forward with a custom design, our team walks through color and graphic options with you before production starts, and every kit gets the photo-verification step by default - not as an upsell, just as how we do it.
FAQ
What does "monster fairings" mean if I'm not looking for the brand?
Most commonly it describes a bold, aggressive fairing design - think heavy graphics, dramatic color contrast, skull or flame motifs. It's a style descriptor, not a technical term, so there's no strict definition - it just signals you want something that stands out rather than a subtle factory-style paint job.
Are ABS fairings as durable as OEM plastic?
Quality ABS injection-molded fairings use essentially the same manufacturing process as OEM panels and hold up comparably for street riding. The durability difference comes down to the paint and clear coat process more than the base material itself.
How long does a custom-painted fairing kit take to ship?
This varies by seller and design complexity, but expect several weeks rather than days for a custom paint job -painting, curing, and photo verification all take real time. In-stock, pre-designed kits ship much faster since the painting is already done.
Can I install a fairing kit myself, or do I need a mechanic?
Most riders comfortable with basic hand tools can install a full kit themselves in a few hours. It's not a specialized job, just a methodical one - going slow and following a logical piece-by-piece order matters more than mechanical expertise.
What's included in a full fairing kit vs. individual pieces?
A full kit should include every body panel plus bolts, windscreen, decals, and heat shielding. Individual pieces are just the panel itself, meant for riders replacing a single damaged section rather than doing a full bodywork swap.


Comments